
Most artificial grass drainage problems are fixable without ripping the whole lawn out, provided the fault sits at the surface, in compacted infill or clogged backing holes. If your sub-base is waterlogged or your turf sits in a natural dip, you’re looking at excavation. Either way, start the same place: go outside during or right after rain and watch what actually happens.
TL;DR:
- Proper diagnosis using a simple funnel test and inspection can reveal whether drainage issues stem from surface blockages or the sub-base.
- Surface problems like compacted infill and clogged backing perforations respond well to thorough cleaning, decompaction, and infill topping.
- Sub-base failure caused by poor grading or unsuitable materials requires excavation and rebuilding with the correct base layers and proper drainage outlets.
- Installing a permeable backing, using MOT Type 1, and ensuring the garden’s water flows away from the turf help prevent recurring drainage problems.
- Routine maintenance like brushing, rinsing, and professional cleanings every 12 to 18 months can keep artificial grass drainage efficient and avoid costly repairs.
What to check now (during or right after rain)
Grab a coat and get out there while it’s still wet. You’re looking for patterns, not just puddles.
- Recurring pooling: does water sit in the exact same spots every time it rains, or does it shift around?
- Spongy patches: press down with your hand or foot. Soft, squelchy give usually means trapped water underneath.
- Persistent odour: a sour or ammonia smell after rain, especially near fence lines, points to pet urine build-up rather than a base fault.
- Blocked edges and seams: check for debris, silt, or adhesive that’s sealed the perforations along joins and borders.
- Run-on from elsewhere: watch whether water is arriving from a neighbouring patio, a downpipe, or a sloped border rather than being generated on the lawn itself.
Five minutes with a torch and a raincoat tells you more than any guesswork later.
Why artificial grass stops draining: the usual causes
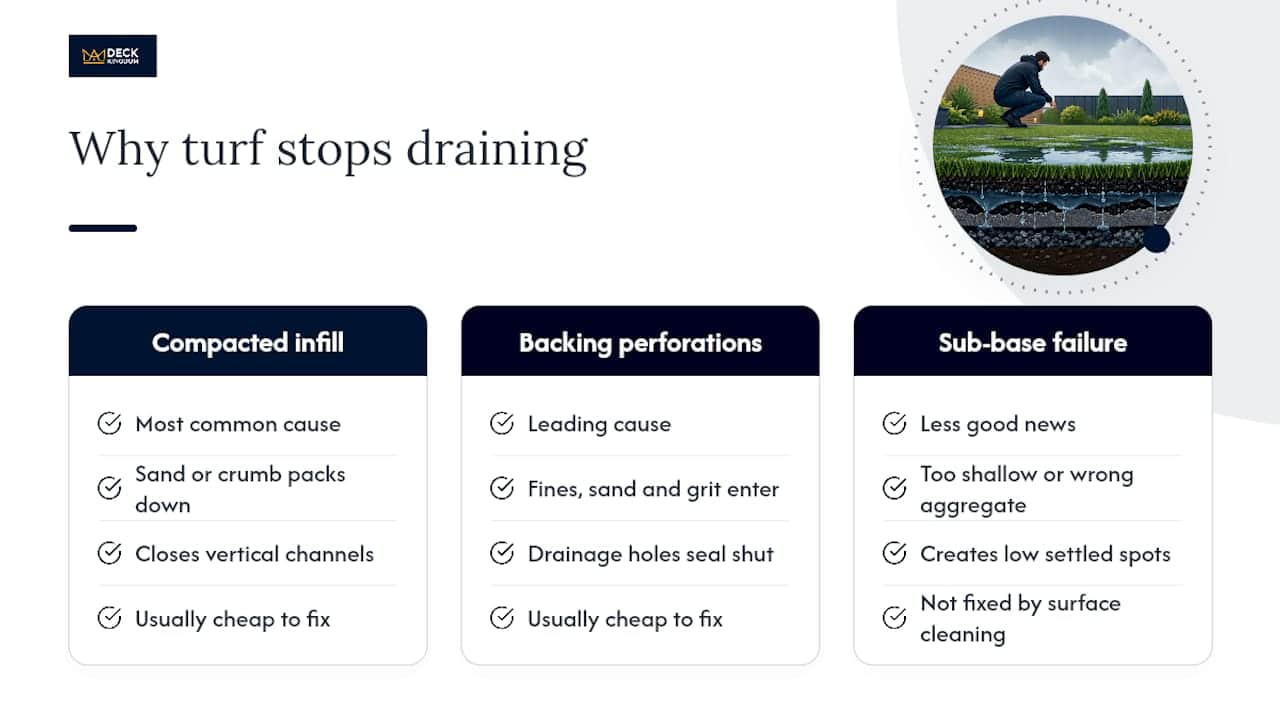
Compacted infill is the most common culprit. Sand or crumb infill packs down over years of foot traffic and rain, and the vertical channels that once let water through simply close up. Organic debris, algae, and fine silt make it worse by binding the grains together.
Backing perforations clog for a similar reason: fines, sand, and general grit work their way into the drainage holes punched through the turf’s backing and gradually seal them shut. Compacted infill and blocked backing perforations are the leading causes of slow drainage and standing water, and they’re usually the good news scenario because they’re cheap to fix.
The less good news is sub-base failure. If the base was laid too shallow, used the wrong aggregate, or has settled unevenly, you get low spots that no amount of surface cleaning will solve. Add poor grading from the surrounding garden and your lawn effectively becomes the collection basin for every downpipe and sloped bed nearby.
How do you diagnose artificial grass drainage problems at home?
Work through these in order. Each one narrows down whether you’re dealing with a surface issue or something underneath.
- Run a percolation test. Set a funnel on the turf, pour in a litre of water, and time how long it takes to disappear. Healthy turf typically clears within 30 to 60 minutes; anything much slower flags compaction or a blocked backing.
- Dig a small probe or test pit. Lift a corner of the turf where you know there’s a problem and inspect the infill condition and the state of the backing holes directly.
- Check the fall with a spirit level. Watch where water actually flows during rain rather than assuming the lawn slopes the way you think it does.
- Escalate if needed. Persistent odour despite cleaning, large soft areas, or pooling that keeps returning after you’ve tried surface fixes are your signal to call a professional rather than keep experimenting.
A funnel test costs nothing and takes ten minutes, yet it’s the single most useful diagnostic most homeowners never think to run.
Surface-level fixes you can try first
If your percolation test came back slow but not disastrous, surface work usually sorts it. Work through this sequence rather than jumping straight to the most aggressive option.
- Sweep the lawn with a stiff broom to lift debris, then rinse thoroughly with a garden hose.
- If that doesn’t restore drainage, use a pressure washer on a wide, low-pressure fan setting; a narrow jet can tear the backing or blast infill out unevenly.
- Decompact the infill with a power brush or a stiff hand rake, working against the grain to break up packed grains.
- Top up infill rather than fully replacing it where possible, adding thin, even layers to avoid recreating the same compaction.
- For pet urine crusts, an enzyme-based cleaner followed by a thorough rinse breaks down the salt build-up that seals infill and causes the worst odours.
Pressure washing combined with infill restoration resolves drainage for many installations where compaction and debris are the main issue, particularly on gardens without heavy pet use.
Pro Tip: If the surface still won’t drain after a proper clean and decompaction, don’t keep throwing infill at it. That’s your cue the fault has moved below the backing, and it’s time to lift a corner and look.
When you need to dig: sub-base and drainage-system repairs
If your test pit shows a saturated, compacted, or uneven sub-base, surface fixes won’t hold. This is where excavation earns its keep, and it’s worth understanding what a contractor should actually be doing.
- Rebuild the base properly. Remove soft topsoil, lay a compacted MOT Type 1 sub-base, then a thin levelling course of sharp sand or grano dust before the permeable membrane goes down. A compacted MOT Type 1 base with a sharp sand or grano dust levelling layer is the standard recommendation for UK soil-based installs.
- On hard surfaces, such as old patios or decking, a 5 to 10mm drainage foam pad or a raised cell system often works better than trying to rebuild a full aggregate base.
- Add a drainage system where needed. French drains, perforated land drains, and channel drains all move water away from the turf, but every one needs a genuine outlet. Connecting to a soakaway or a clear discharge point is what actually makes these systems work, rather than the drain itself.
- Regrade for a gentle fall, typically 1 to 2%, and never direct water towards your own foundations or a neighbour’s boundary.
When you get quotes, ask about compaction testing and aggregate gradation directly. Poor grading and incorrect base gradation are frequently cited causes of ponding on artificial turf installations, so a contractor who can’t answer confidently on either point is worth reconsidering. For persistent clay soil, our guide to sub-base depths for UK gardens covers how much extra base improvement clay-heavy plots typically need.
Preventing recurrence: what to choose at purchase or installation
Getting the build right the first time saves you this whole process later.
- Choose turf with a permeable backing, especially for pet-heavy gardens or naturally wet sites.
- Insist on MOT Type 1 for the base and avoid soft builders’ sand, which compacts and shifts far more than sharp sand or grano dust.
- Design your edges so the perimeter isn’t accidentally sealed. A permeable border or small channel drain at the boundary stops water pooling against fences and walls.
- Use a permeable geotextile weed membrane rather than an impermeable plastic sheet, which traps water instead of letting it through.
- Think about the whole garden’s water flow before you lay turf. If every downpipe and sloped bed drains towards the lawn, no drainage system will keep up indefinitely.
Using soft sand or sealing edges with impermeable adhesive during installation are common, entirely avoidable causes of long-term drainage failure. If you’re managing runoff from the roofline too, a well-maintained gutter system matters more than people expect. Poorly cleared gutters overflow straight onto nearby lawn edges, so it’s worth reviewing your gutter maintenance routine alongside any turf drainage work.
Maintenance timetable and red flags
A little routine effort keeps most lawns problem-free for years.
- Brush briskly once a month and rinse after leaf fall in autumn.
- Book a professional deep clean every 12 to 18 months, more often with pets.
- After storms, check outlets are clear and test known low points.
- Red flags needing a professional: pooling lasting more than 60 minutes, growing soft patches, or odour that survives a proper clean.
Costs vary enormously between a simple deep clean, a partial rebase of one problem area, and a full lift-and-relay, so get a site visit before assuming the worst.
Expert advice on drainage decisions
Most homeowners jump straight to worrying about full replacement when a percolation test and a proper clean would have told them the fault was sitting in the top two inches all along. Deck Kingdom’s installation guides and drainage advice are built for exactly that diagnostic-first approach, whether you’re installing fresh turf or troubleshooting an existing lawn.
- If you’re specifying backing type, pile height, or infill for a pet-heavy garden, our artificial grass advice hub and individual product pages carry the technical detail you need before ordering samples.
- Healthy turf typically clears a litre of water within 30 to 60 minutes; use that benchmark as your own go/no-go test before committing to any repair.
- Call a contractor once you’ve confirmed the fault sits below the backing. DIY surface work handles the majority of cases, but sub-base rebuilds need proper compaction equipment.
Why the “just add more infill” advice misses the point
The conventional advice on artificial grass drainage problems treats every symptom the same way: clean it, top up the infill, hope for the best. That works often enough that it’s become the default answer, but it skips the one step that actually matters, which is working out whether you’re dealing with a surface fault or a structural one before you spend a penny.
A funnel test takes ten minutes and costs nothing, yet it’s the difference between a Saturday afternoon job and a contractor quote running into four figures. Homeowners who skip it end up either over-investing in surface fixes that were never going to solve a sub-base problem, or panicking into a full replacement when a proper clean and decompaction would have done the job.
My honest read on this: diagnose before you spend. Surface issues are common, cheap, and satisfying to fix yourself. Sub-base problems are rarer but genuinely need excavation, and no amount of infill will paper over a low spot in the base. Get the test right first, and everything else follows from there.
— Amanda Cheetham
Sources
- Artificial Turf Drainage Problems: Signs of Hidden Issues — Turfresh
- Topic brief — Artificial turf drainage investigations (SGH)
- Connect to soakaway or outlet — UK Paving Talk Group
FAQ
What is best for drainage under artificial grass?
A compacted MOT Type 1 sub-base with a thin levelling layer of sharp sand or grano dust suits most soil-based UK gardens, while a 5 to 10mm drainage foam pad works better over existing hard surfaces like patios or decking.
Why are people getting rid of artificial grass?
Persistent odour from pet urine, recurring pooling, and spongy patches that don’t clear up after cleaning are the main reasons homeowners consider removal, though most of these issues are fixable with proper diagnosis and surface or sub-base repair rather than full replacement.
What is a common issue with artificial turf?
Compacted infill and clogged backing perforations are the most frequent causes of poor drainage, both of which typically respond to professional cleaning and infill restoration rather than needing the turf lifted.
What should you not do to artificial grass?
Avoid sealing the edges with impermeable adhesive, using soft builders’ sand instead of sharp sand or MOT Type 1 during installation, and ignoring runoff from neighbouring hard surfaces that turns the lawn into your garden’s default drainage basin.
